Getting your first website online might sound like a daunting technical hurdle, but it is actually a straightforward process when you use the right tools. Instead of worrying about complex server management or confusing code, you can focus entirely on your creative vision. By using a managed platform, you can skip the headache of manual configurations and get your site live in just a few minutes. You can skip the headache of manual configurations and get your site live in just a few minutes by using a reliable hosting platform like Cloudways.
This guide is designed to walk you through the essentials, ensuring that every step is clear, manageable, and stress-free for beginners.
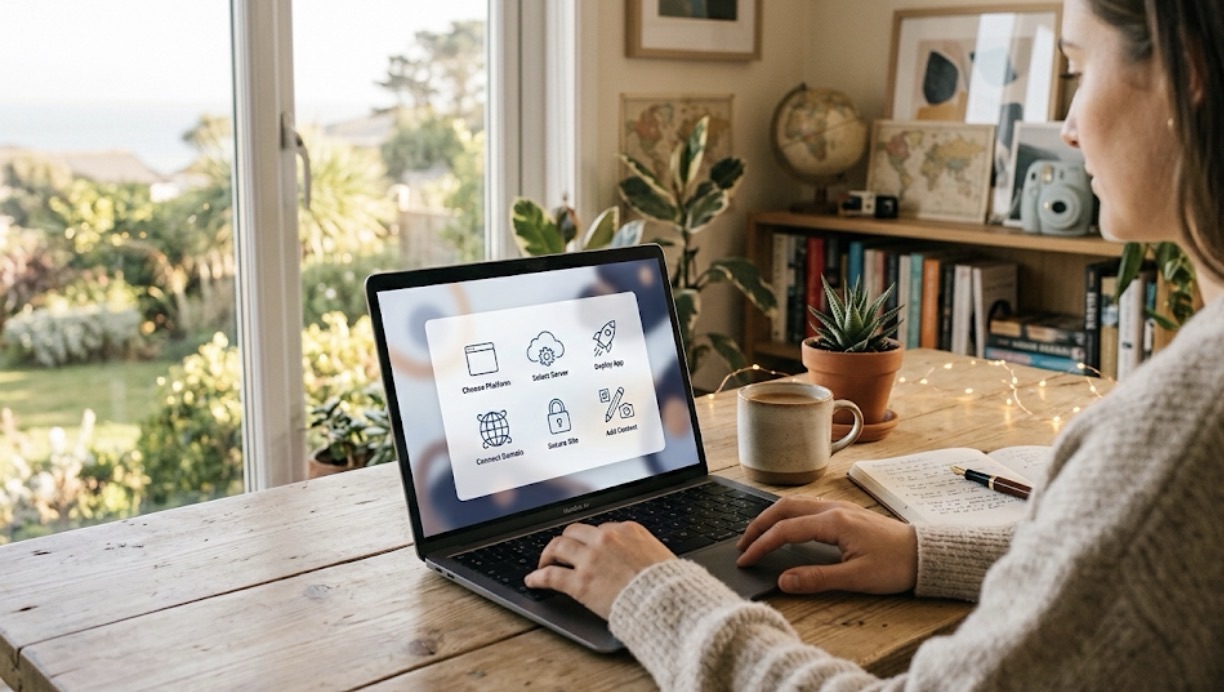
1. Choose Your Website Platform
Before diving into the technical setup, take a moment to define what kind of website you are actually building. Whether you are launching a personal lifestyle blog, a portfolio, or an online shop, clarity at the start saves time later.
• Identify your goal: Are you blogging, selling products, or showing off your photography?
• Select your software: Most people start with WordPress because it is user-friendly and highly customizable.
• Register your domain: Pick a domain name that reflects your brand and is easy for your audience to remember.
• Draft your plan: Having a rough idea of your layout will make the setup process feel much more organized.
2. Sign Up and Select Your Server
Once you have your account ready, the next step is choosing the “home” for your website, which is essentially renting space on a high-speed computer. You do not need to be a technical expert to make this choice; the interface is designed to guide you through it naturally.
You can sign up for your account here to get started and select the server location that fits your audience best.
• Pick a location: Always choose a server location closest to your target audience to ensure the site loads as fast as possible.
• Right-size your resources: You can start with a basic server plan, as you can easily scale up as your traffic grows.
• Keep security in mind: Always set a strong, unique password for your account to protect your data from the start.
• Review your selection: Take a quick look at the summary before you confirm, as it ensures everything is aligned with your needs.
3. Deploy Your Application
After your server is ready, “deploying” your application is the exciting moment where your digital space actually comes to life. This process automatically installs all the necessary files and software so you don’t have to touch a single line of code.
• Choose your app: Simply click on the application icon, such as WordPress, to begin the installation.
• Name your project: Give your application a clear name so you can find it easily in your dashboard later.
• Automated installation: Watch as the system handles the heavy lifting, connecting the database and files in the background.
• Final confirmation: Once the progress bar hits 100%, you are ready to move on to the next exciting phase of your site.
4. Connect Your Domain Name
Your domain name is the digital address that helps people find you, and connecting it is a simple task of updating your settings. While it involves a little bit of “behind the scenes” work, you are really just telling the internet where your website files live.
• Access your provider: Log into the site where you bought your domain name.
• Find the DNS settings: Look for a section labeled “DNS Management” or “Domain Settings.”
• Update the IP address: Copy the specific numbers (IP address) from your server dashboard and paste them into the “A Record” field of your domain settings.
• Allow for propagation: Remember that this change can take a few minutes or sometimes a few hours to update across the entire web.
5. Secure Your Site with an SSL Certificate
Security is the most important step for building trust, as it keeps your visitors’ information safe and ensures your site is viewed as credible by browsers. An SSL certificate is what creates that little padlock icon in the browser bar, signaling to everyone that your site is safe to visit.
• Navigate to security: Inside your dashboard, find the tab labeled “SSL Certificate” or “Security.”
• Use free options: Most platforms offer “Let’s Encrypt” for free, which is perfect for new website owners.
• One-click installation: Simply enter your email address and domain name to request the certificate.
• Activate the change: Once installed, ensure that your site automatically redirects all traffic to the secure “https” version.
6. Start Adding Your Content
Now that the technical foundation is solid and your site is live, you can finally shift your focus to the most rewarding part: sharing your content. Your website is a blank canvas waiting for your unique voice, photos, and ideas to fill it.
• Customize your theme: Pick a visual design that matches the “vibe” of your brand and personality.
• Create core pages: Start by adding an “About Me” page and a “Contact” form so people can learn who you are.
• Write your first post: Don’t worry about being perfect; just aim to share something authentic and helpful.
• Test everything: Click through your links and menus to make sure everything works smoothly for your future readers.
Stay connected for more digital lifestyle tools, apps, and website guides.
— Happy Reading from Tia —
Leave a Reply